제목
×
재생속도 설정
상태 메시지
랜드모아(pc)
|
▽APM설치(1) - 우분투 서버에 apache2 설치하기
|
| |
2018-06-15 12:50:00
|
|
댓글:(0)
조회:2064
|
|
|
|
|
|
| APM설치(1) - 우분투 서버에 apache2 설치하기
[apache2 웹서버 설치하기] 웹서버는 apt 로 설치키로 합니다.
# apt-get install apache2
[서버 버젼체크] ~# apache2 -v Server version: Apache/2.4.18 (Ubuntu) Server built: 2018-04-18T14:53:04
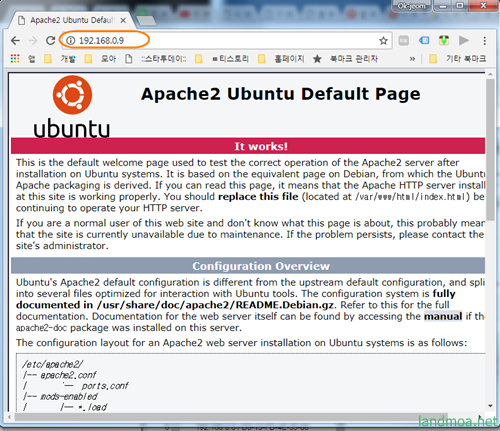
[웹서버 기동확인] 이렇게 apache를 설치하고 웹브러우즈에서 테스트하면 웹페이지가 바로 기동이 됩니다. http://192.168.0.9
[필수 묘듈의 활성화] # a2enmod rewrite # a2enmod headers # a2enmod ssl # a2dismod -f autoindex [웹서버 기본설정] 이용하기 위해 간단만 몇가지 설정을 해 줍니다.
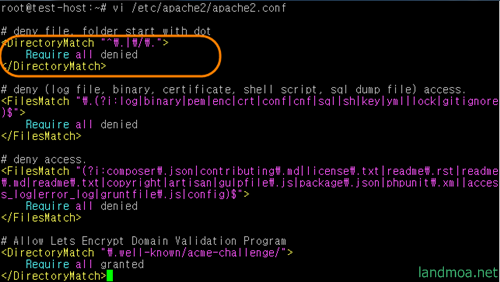
~# vi /etc/apache2/apache2.conf 파일 하단부의 구문 다음에 아래 내용을 추가 합니다.
====== 여기부터
# deny file, folder start with dot [DirectoryMatch "^.|/."> Require all denied [/DirectoryMatch> # deny (log file, binary, certificate, shell script, sql dump file) access. [FilesMatch ".(?i:log|binary|pem|enc|crt|conf|cnf|sql|sh|key|yml|lock|gitignore)$"> Require all denied [/FilesMatch> # deny access. [FilesMatch "(?i:composer.json|contributing.md|license.txt|readme.rst|readme.md|readme.txt|copyright|artisan|gulpfile.js|package.json|phpunit.xml|access_log|error_log|gruntfile.js|config)$"> Require all denied [/FilesMatch> # Allow Lets Encrypt Domain Validation Program [DirectoryMatch ".well-known/acme-challenge/"> Require all granted [/DirectoryMatch>
====== 여기까지
참고로 앞부분의 [ 표시는 모두 < 로 바꾸어 주셔야 합니다.
위 화면은 설정파일에 직접 붙여 넣는 화면입니다. 위처럼 주황색 타원형으로 표시된 아래에 위 소스를 붙여 넣으시면 됩니다. 설정을 마쳤으면 apache 재기동합니다.
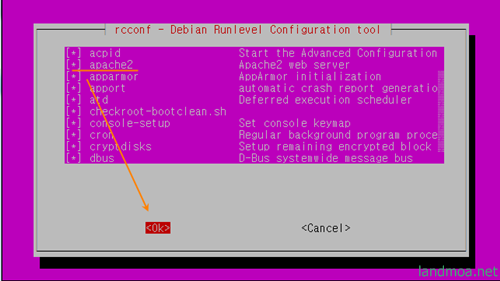
[웹서버 자동 시작설정] 서버 재시작(reboot)시 웹서버 자동 시작을 위한 설정 # apt-get install rcconf # rcconf 키보드의 [스페이스]로 체크하시면 됩니다. 설정이 끝났으면 [ok]를 눌러 끝냅니다.
|
|
|
|
|
|
|
|
|
|
| |
|
|
|
복수단어 검색은 공백(space)로 구분해 주세요.
|


 우분투 다운로드 사이트